
This document is intended for people who have a little experience of Linux (or other flavours of Unix, such as macOS) and need to use it for program development. It is assumed that the reader has some knowledge of using a terminal window for typing commands; if not, you should gain some experience with that before proceeding.
If you have worked only on Windows in the past, you will be used to starting an application and working within it for doing everything associated with a task; for example, Word for preparing documents, Visual Studio for software development, and so on. Although it is possible to work in this way under Linux, that approach is not typical — the original Unix philosophy was for each program to do one thing but do it well. It is normal under Linux to have several programs running on different parts of your computer's display at one. A fairly typical screen layout for program development is shown below, featuring one editor window, one terminal window for compiling and running and another for looking at reference material (or playing music or whatever).
Moving from task to task just involves clicking in the relevant window. Indeed, under Linux you can configure the window manager to switch automatically to whichever window the mouse cursor moves to ("focus follows mouse") and automatically bring it to the front ("auto-raise").
If you are reading this document through, the next step is to read about compiling programs. However, if you want to find the discussion of some other topic, or just want to see what is covered, the stages we shall work through are:
Before discussing how to compile programs in any detail, you need understand the steps involved. The compiler takes your carefully-typed program and checks it for errors. If it cannot spot any, it converts it to a binary form. This binary program cannot be executed by the computer because there are always calls to functions which are not part of the program — functions such as sqrt and those that do input and output. There is a separate program that takes the compiler's output, called object code, and links it with the standard functions to form executable code. This program is called a linker or loader. The computer understands executable code.
Now we know the theory, how do we do it in practice? Let us say that we have written a C program that simply writes Hello World to the terminal window, stored in a file called hello.c. (All programs written in C must have file names that end in .c under all flavours of Unix, including both Linux and macOS). The C compiler is invoked by typing
gcc hello.c(To be precise, this is the GNU C compiler, widely regarded as the best around.) The compiler checks the syntax of your program. If there are no mistakes in the program, the compiler generates its object module. Unless we tell it not to, the compiler then automatically invokes the linker, ld, to link the program with the run-time library. The resulting executable code is stored in the file a.out. You then run the executable program by typing its name:
./a.out
If you do not like calling your program a.out, you can use the -o option on the gcc command
gcc -o hi hello.cwhich calls the executable program hi rather than a.out. You would then run it by typing
./hiDon't fall into the beginner's trap of typing
gcc -o hello.cwhich compiles the source code in hello.c and overwrites it with the compiled program. Embarrassing.
What if you prefer to work in C++ rather than C? In this case, you would store your program in a file called hello.cc and perform the compilation using a command like
g++ -o hi hello.ccAlmost everything else written in the document applies equally to programs written in C and C++.
Java compilation is pretty similar:
javac hello.javaand this creates hello.class. You execute it with the incantation
java helloIf you have or create a JAR-file called converse.jar, you execute it by typing
java -jar converse.jar
If you have written a program and have it working to your satisfaction but find it runs a little too slowly, you can tell the compiler to fiddle with the object code to make it run more quickly. You do this with the -O command-line qualifier
gcc -O -o hi hello.cNote that this is an upper case 'O'. You can optionally give the qualifier a number to tell it how much to try to speed up the code; -O9 is the most.
The wily programmer will ensure that his or her program gives identical results with the optimizer turned on as it does with it turned off. Speaking personally, I use the optimizer rarely as a more dramatic improvement in performance usually arises from a cleverer algorithm.
You will be shown how to use a symbolic debugger below — it is by far the most effective way to figure out why a program is misbehaving. To compile a program for use with the debugger, use the -g qualifier. I also tend to compile with all the compiler's warning messages turned on (-Wall), as code that generates no warnings is more likely to be right. Hence, my typical compilation incantation is something like
gcc -g -Wall -o hi hello.c
It is rare for programs of any significant length to be stored in a single file; instead, it is much more common for some functionality to be stored in one file and the program that uses it in another. To give an example, think of a simple game: the game itself might be stored in one file and the routines it uses for generating random numbers stored in another. Let us say the game is stored in main.c and the random number routines in rng.c. We would compile them together with the command
gcc -o game main.c rng.cThis will compile both C source files together and write the executable into game.
If you find that the routines in rng.c never change but the code in main.c does, you can compile rng.c to object code with the command
gcc -c rng.cto yield the file rng.o. After that, the compile command
gcc -i game main.c rng.owill take less time. Note that we have specified the object module (ending in .o) rather than the C source code. The time difference in this case will be negligible but, for large programs, this can give a great saving in compilation time.
All programs use external libraries, even if all they do is implement the input/output functionality required by the language. In C and C++, all programs are linked with the relevant run-time library by the compiler; you cannot turn that off. However, many programs also make use of other external libraries; in particular, if you use mathematical functions such as sqrt() and sin(), you must explicitly tell the compiler to link against the maths library:
gcc -o myprog myprog.c -lmThat's 'l' for library and 'm' for maths. Some types of application require quite a few libraries: for example, OpenCV requires three libraries and 3D graphics with OpenGL about twice that number. Fortunately, there are ways that avoid you having to remember (and type) the complete incantation, which will be discussed towards the end of this document. As an aide memoire though, the utility is make.
You now have a fairly complete knowledge of the compilation process, so it is time to turn out attention to getting the program into the machine.
Although there are many editors on Linux systems, and a few integrated development environments (IDEs) such as Eclipse, this document is centred around one in particular: Emacs. Emacs has been around a long time but provides many features that are programmer-friendly: syntax-awareness, brace-highlighting, incremental search, symbolic debugging, managing compilation.
You start Emacs in one of the usual ways:
When the Emacs window comes up, please resist the temptation to make it fill the screen — see the beginnning of the document for why. Feel free to make the window longer but it's wise not to make it wider: source code is best presented in lines of no longer than 80 columns, the initial width of the Emacs window.
You can use Emacs in the way you're most familar with, by pulling down menus or clicking on buttons. However, as you become more familiar with it, you'll work more quickly if you learn the keyboard shortcuts — I work entirely through shortcuts. Whichever way you work, you will need to type Emacs commands from time to time, and you bring up the command prompt by typing (in Emacs terminology) M-x ("meta-X"). On a PC keyboard, this is Alt-X (hold down the Alt key, type x simultaneously).
In utilities such as Word, you'll be used to entering the text you want and then saving it to a file. With Emacs, it's better if you do things in a different order: first edit the file you want (the keystrokes for this are C-x C-f (control-X, control-F), then type the name of the file you want in answer to the prompt. If you end the filename in .c, Emacs will switch into C "mode", and if you end it in .cc, it will switch into C++ mode. (There are other modes too, for different types of program or document.) In C mode, Emacs understands the syntax of the lines you type and that helps you get your code right.
To get going, edit hello.c and enter the following lines:
#include <stdio.h>

int
main (int argc, char *argv[])
{
Emacs realizes that you have opened a loop and is prepared to indent your code
accordingly. Start entering your next line by typing the <tab>
key: you will see that Emacs has indented it by the right amount for you to
enter your printf() call. When you type the matching close-brace,
Emacs will line up under the opening one sensibly. If you enable parenthesis
highlighting, Emacs will also show you the matching opening brace when you
type the closing one, a good visual check. As you edit code, you will end up
with incorrect indentation from time to time; simply type <tab>
again at the beginning of the time to re-indent it. If you find the
indentation is wrong at any time, it is because you have made a syntax
error.
When you have entered your program source code and saved it to disk, the easiest way to compile it is to change focus to the terminal window and type the compile command. When make is discussed later in this document, using it from Emacs will also be covered.
Every time you save a file in Emacs, it creates a backup version of the file (by appending the ~ character to the filename) which contains the file's content before you started editing it — and this applies to all files edited by Emacs, not just program source. This is a really useful feature: I can't tell you the number of times I have reverted to a backup file when things have gone horribly wrong.
There is actually a lot more that could be said about Emacs but instead we shall move on to discuss defensive programming.
All programs have bugs in them. The wily programmer will design programs with the need to test and debug them in mind. They will also go to some lengths to try and build in checking and portability aids.
Debugging programs is an intellectual challenge, requiring a combination of logical thinking and low-down cunning. It is great fun! The main approaches are:
The most common place at which programs have hard-to-find bugs is in passing arguments to subroutines. The use of function prototypes reduces these but does not eradicate them. It is therefore a good idea to check any arguments passed into subroutines carefully within the subroutine. Likewise, it is sensible to carefully check any arguments passed into a main program. Adding 'sanity checks' is also a good idea. For example, when you are writing a switch statement to cope with one of four possibilities, include a default that prints a message like:
This can't happen: I'm `switch'-ing on %d!and exits.
The C language and compiler provides a few features to help you with debugging programs. The most useful of these is probably the assert macro. To use this, you must have the line
#include <assert.h>in your code. You can then use assert to perform some checking of your code. This is perhaps best illustrated by example. Consider the declarations
int data[100], lower, upper;where lower and upper are used as indices into data. We obviously don't want to allow these indices to be outside the range 0–99, so we could write:
assert (lower >= 0 && lower < 100);
assert (upper >= 0 && upper < 100);
if (data[lower] > data[upper]) ...
If either argument of assert should prove to be false as the program runs, the program will be stopped and a message produced:
FALSE ASSERTION "lower >= 0 && upper < 100"
AT LINE 42 OF FILE myprog.c
This sort of testing is invaluable in debugging but, when the program is thoroughly debugged, you might want to turn off the overhead of assert's checking. You can do this by simply including the line
#define NDEBUGin your program before you include assert.h.
In fact you can do this with your own checking code, too:
void mysub (int val)
{
#ifdef NDEBUG
   if (val < 0) {
     fprintf (stderr, "mysub: fatal -- bad value %d!\\n", val);
     exit (EXIT_FAILURE);
   }
#endif
...
Now, it's time to take a look at symbolic debugging.
The best technique for debugging software us to use a utility known as a symbolic debugger. This lets you run through your program one or more steps at a time, to follow the flow of control into subroutines if you wish, and to examine and set program variables.
To illustrate the use of the debugger, let us consider debugging the following program
#include <stdio.h>

float
mean (float a[], int n)
{
  int i;
  float sum = 0.0;

  for (i = 1; i < n+1; i++)
    sum += a[i];
  return sum / n;
}

int
main (int argc, float *argv[])
{
  int i, a[100], ave;

  for (i = 0; i < 100; i++)
    a[i] = i;
  ave = mean (a, 101);
  printf ("Mean: %d\\n", ave);
  return 0;
}
This has three bugs, one of which results in a warning message from the
compiler. Running the program results in
Mean: 0which is clearly wrong.
Before using the debugger, you have to compile all the files that comprise your program with the -g flag, as in
gcc -o debugit -g debugit.cThis tells the compiler to leave the additional information needed for the debugger in the compiled code.
M-x gdbEmacs will prompt you for the program to debug with a message like
Run gdb (like this): gdb --annotate=3 debugitIf the prompt isn't exactly like this, edit the gdb command so that it will run on debugit, then hit return. A new Emacs window will open and gdb's introductory messages will appear at the top of it. You will finally see gdb's prompt:
(gdb)You then interact with gdb by typing commands, most of which are a single letter.
This section takes you through a session working on debugit. It's a good idea to work through it yourself while reading this — now you see why having several programs running on the same screen is a good idea! However, before doing so, it is worth looking at a summary of the most important gdb commands:
| command | purpose |
|---|---|
| h | reminds you what the gdb commands are |
| b | sets a breakpoint |
| r | runs (or re-runs) your program from its start |
| c | continue execution from the current statement |
| s | executes one statement of your program; goes into subroutines |
| n | executes one statement of your program; steps over subroutines |
| p | examine or set a program variable |
| bt | output a backtrace of the call stack |
The most obvious thing to do is simply to run your program. You do this with the r command. If your program requires command-line arguments, you can give them as arguments to r. The program will then run. If you do this with debugit, you will obtain output like:
Starting program: /home/alien/ce316-website/debugit
Mean: 0

Program exited normally.
(gdb)
which isn't much help. Let us now start digging into the program.
The first thing to do is halt execution just inside the main program:
(gdb) b main
(gdb) r
The main here is the name of a module; you can make execution halt just inside any module or at any line. The r command then starts the program running from its beginning again.
When execution stops, Emacs will bring up the source code of your program, indicating where it has stopped — more precisely, at the beginning of the next line of code to be executed; see below.
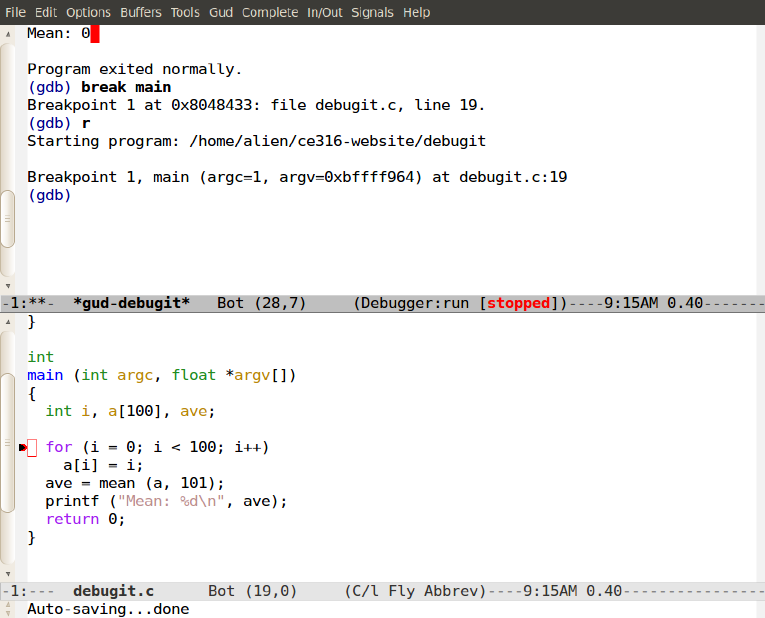
At this point, you can examine some program variables. Indeed, if you're not that confident about how C handles arrays and pointers, this is a good way to learn how they work:
(gdb) p argc
$1 = 1
(gdb) p argv
$2 = (float **) 0xbffff964
(gdb) p *argv
$3 = (float *) 0xbffffac1
(gdb) p *argv[0]
$4 = 4.63080422e+27
(gdb) p argv[0]
$5 = (float *) 0xbffffac1
However, let's get back to the job in hand. Let us execute one line of code by typing
(gdb) nIf you look at the table above, you'll see that the n and s commands are similar; if the line to be executed involves a procedure call (not just a procedure you have written but also a system one such as printf()), n will execute it and move to the next line of the current procedure, while s will step into any procedure and stop inside it.
Having stepped one line, you will see that Emacs has moved the black arrow down by one line of source code, and there is a red circle indicating where a breakpoint has been set — if you were to re-run the program, it would stop there again. Let us examine things here:
(gdb) p i
$6 = 0
(gdb) n
(gdb) p a[i]
$7 = 0
This all looks fine, so let us turn our attention to the routine called mean().
(gdb) b mean
Breakpoint 2 at 0x80483ea: file debugit.c, line 7.
(gdb) c
Continuing.

Breakpoint 2, mean (a=0xbffff718, n=101) at debugit.c:7
c tells gdb to continue execution from the current breakpoint. It tells you where it has stopped and moves the arrow showing you the next line of code to be executed.
Let's move into the routine a little and look at our array.
(gdb) n
(gdb) p a[10]
$8 = 1.40129846e-44
That's weird: it contains a float value but our main program set it to the value 10. Looking at the code, we see that main() declared an int array but mean() declares it as float — that's the cause of the problem. So let's quit gdb:
(gdb) q
A debugging session is active.

	Inferior 1 [process 1594] will be killed.

Quit anyway? (y or n) y

Debugger finished
change the declaration in mean() to be int and re-compile the program. The warning message that we obtained previously has gone, so that's promising. Simply running the re-compiled program results in
Mean: 49which is about what I expect.
At this point, we would naturally go away and get on with something else. However, there are still three bugs in debugit. It's pretty obvious from reading the source code what they are — most of the bugs you track down with a symbolic debugger are more subtle — but can you use gdb to identify them?
Having got some idea of what you can use a debugger for, let's move on to look at the normal way one compiles large programs under Linux. We'll look at a couple of other useful compiler options too.
The discussion of compiling mentioned that using a handful of libraries when building a program is not uncommon; remembering what they are and the order they should be specified in (yes, order is important) for every program you might need to compile is obviously not feasible. The approach that has become conventional on Unix (Linux, macOS etc) is to use the make utility — indeed, they are so pervasive that many Windows compilers provide make functionality.
To use make, you first create a file called Makefile (or makefile) which describes which programs are involved in building a program and how the compilation is done. When that has been saved, all you have to do is type
maketo have make perform the compilation for you. Actually, make does a little more than this: it looks at when the output file of each compilation step was created and only re-compiles it if the corresponding source file is newer; that minimizes the time spent waiting for the compilation to finish.
If for some reason you want to use a file with a name other than Makefile with make, let's say myfile.txt, you can tell make to use it with the command
make -f myfile.txt
A Makefile for compiling the debugit program we looked at earlier, and also shows most of the common features you'll use, is
# Makefile for debugit.
CC = gcc
CFLAGS = -g

debugit: debugit.c
        $(CC) $(CFLAGS) -o debugit debugit.c

clean:
        \\rm debugit debugit.c~
You will see that there are two main parts to a Makefile, a set of
symbol definitions (the lines containing equals signs), conventionally near
the top, and a set of stanzas, each of the form
target: dependencies
       how to create the target from the dependencies
One important thing to note is that the indentation on the second line should
consist of a single <tab> character. Some modern
implementations of make allow any whitespace character to be used but, to be
sure your Makefile works anywhere, you should indent using a
<tab>.
There are two dependencies here, debugit and clean. Concentrating on the former for the moment, you will see that debugit has a single dependency, debugit.c. The strange-looking compilation command substitutes the values of the symbols created at the top of the Makefile before it is passed to the shell to be executed. This is obviously overkill here but when there are many dependencies, having a single symbol to alter to change every compile command improves consistency and reliability (and saves time). By default, make compiles the first target in the file, so one only need type
maketo compile debugit. As make runs, it outputs the commands it is having executed on your behalf to your terminal window.
What of the clean target? It has no dependencies and its purpose is simply to remove the compiled version of debugit and any backup files of the source code created by Emacs. When you type
make cleanmake will tidy up the directory. It is conventional but not necessary to have a clean target. Incidentally, it is a bad idea to remove Emacs backup files automatically — this is something best done only when are confident that your program works correctly, in case you make some edits that have gone disasterously wrong and you need to go back to an earlier version.
Now that you have an idea of how to use make and Makefiles, we shall move on to look at using and creating libraries, which involves more sophisticated use of make.
The use of libraries has been mentioned a couple of times without any detail. You now know enough detail of the program development process under Unix (Linux, macOS etc) to have an appreciation of what is going on.
Let us start by looking at how one would compile a program that uses OpenGL, the industry-standard 3D graphics libraries, driving the X window system that Linux uses. All the gory detail is hidden inside a Makefile:
CC = gcc
CFLAGS = -Wall -g -L/usr/X11R6/lib
GL_LIBS = -lGLU -lGL
X_LIBS =  -lX11 -lm

PROGRAMS = opengl-01 opengl-02

all: $(PROGRAMS)

opengl-01: opengl-01.c
        $(CC) $(CFLAGS) -o opengl-01 $(GL_LIBS) $(X_LIBS) opengl-01.c

opengl-02: opengl-02.c
        $(CC) $(CFLAGS) -o opengl-02 $(GL_LIBS) $(X_LIBS) opengl-02.c

clean:
        \rm $(PROGRAMS)
The basic structure of this will be familiar from our discussion of make: a set of symbol definitions followed by a set of stanzas describing how to compile individual programs. The default compilation target is all, which is a list of all the programs to be compiled, and there is a clean target.
You have already seen how to use the maths library when compiling: simply add -lm to the compile command. By analogy then, it is clear that -lX11 is a library, as are those in the definition of GL_LIBS. Given the names, it is reasonable to conclude that X11 is the X window system's library, while GLU and GL form part of OpenGL.
There is a compiler option that we have not encountered previously: -L, and it appears to be associated with a directory. As you have probably guessed, this instructs the compiler (or, more precisely, the linker) to look in the directory given for libraries — the X window system libraries conventionally reside there on Linux and macOS.
One subtle point is that linkers traditionally work from left to right on the command line, so it is important that you list dependencies after the things that depend on them. Here, OpenGL calls X window functions to create and interact with windows on the screen, so the X libraries must appear on the command line after the OpenGL libraries.
Just as -L tells the compiler where libraries are to be found, there is a -I (that's `i' for `include') qualifier that tells the compiler where to look for the files in #include directives inside C source.
If -lm causes the compiler to use the maths library, what is its filename? Under Unix, libraries conventionally end in .a (it actually stands for `archive'), and the compiler prefixes the library name after the -l with lib, so that the complete filename of the maths library is libm.a. That file is searched for in standard directories, such as /usr/lib. However, you should be aware that this description is a gross over-simplification of how things work in practice on modern versions of Unix, including Linux and macOS, as most libraries are not linked into the program at compile time but linked dynamically as the program is loaded into memory; explaining how this works in detail is well beyond this introductory document.
As you write programs, you will find that you end up using the same functions time after time. You can obviously copy them from one program to another as you write them but when you fix a bug in one version of the function, you have to remember to make the same modification to all the other versions of it — exectly the wrong way to maintain software! It is much better if you centralise these utility routines by putting them into a library, and then use that library in your programs.
Creating and using your own libraries isn't all that tricky once you have mastered make and Makefiles, as all the complexity goes into the Makefile. We shall start by considering the principles, then look at an example.
A library is a set of object modules, so the Makefile needs to compile the source code only as far as object code. The object modules are then combined into a library. An index to the library must be created — not all flavours of Unix require this, but the step is included here so you can see how it is done. Programs are then linked against the library simply by listing its name on the compile command.
To illustrate this, here is an excerpt from the Makefile that compiles one of the author's libraries. You will see several of the features discussed when we considered make. Take a good look at it; the important features will be discussed below.
# The compiler we'll use and the compilation options we'll give it.
CC = gcc
CFLAGS = -g -Wall -I/opt/local/include
LIBS = -L$(INSTALLDIR) -L/opt/local/lib -ljpeg -lpng -L/usr/X11R6/lib -lX11

#  Sources and object files.
ADLIB = libadlib.a
PROGRAMS = test-program.c
LIBSRC = adlib__init.c adlib_abs.c adlib_ytranspose.c
LIBOBJ = adlib__init.o adlib_abs.o adlib_ytranspose.o

# The default compilation rule is suitable for a library routine.
%.o: %.c adlib.h
        $(CC) $(CFLAGS) -c $<

# Targets for the library and programs.
test-program: test-program.c adlib.h $(ADLIB)
        $(CC) $(CFLAGS) -o test-program test-program.c $(ADLIB) $(LIBS) -lm

$(ADLIB): $(LIBOBJ)
        ar -rv $(ADLIB) $(LIBOBJ)
        ranlib $(ADLIB)

# Targets for book-keeping.
clean:
        \\rm $(LIBOBJ)

pristine:
        \\rm $(LIBOBJ) $(ADLIB) \\
        adlib.tex *.html *.log *.aux *.toc *.lo? *.pdf test-program

listing:
        pr -n10 -l52 README TODO Makefile adlib.h \\
         $(PROGRAMS) $(LIBSRC) | mpage -2l

dist:
        tar zcvf adlib.tar.gz README Makefile \\
        adlib.h one_image.h two_images.h \\
        $(PROGRAMS) $(LIBSRC)
The top part of the file contains the usual type of symbol definitions. Following that is something the looks like a compilation stanza but without a definite target or dependencies:
# The default compilation rule is suitable for a library routine.
%.o: %.c adlib.h
        $(CC) $(CFLAGS) -c $<
As its comment suggests, this is a default way of getting from a .c
file to a /.o (object module) file: one invokes the compiler with the
-c qualifier. As we shall shortly see, all of the source files are
compiled using this.
The first real target in the Makefile is test-program. One of its dependencies is adlib.h, the library's header file, and another is the library itself, adlib.a — so the library will be built, if necessary, before the test program. The following stanza creates the library (or updates it if it already exists) from the object modules — and the object modules are created using the default compilation rule. More precisely, the ar command updates the library and the ranlib one regenerates the library's index. This might all seem complicated at first but you'll see that most Makefiles are actually pretty similar. The only tricky thing is getting the syntax right.
In addition to clean, which simply deletes the object modules used to create the library, there is a pristine target to get rid of all files that can be recreated. There are also targets for producing a printed listing and creating the library's distribution.
| Web page maintained by Adrian F. Clark [contact] |